How To: Course Reserves in Alma
Overview
The CARLI Resource Sharing Committee reviewed Ex Libris's Alma documentation, along with companion documentation created by other Alma libraries and consortia as found online to compose this step-by-step guide for managing course reserves in Alma. Comments and questions on these steps are welcome; please email CARLI support.
Updated 9/17/2024 AEA
Required Roles
- The options available under the Fulfillment menu are dependent upon your assigned user roles. Your list of options may be different than the screenshots included below. If you do not have options for Course Reserves, you will need to work with your institution's User Administrator to be assigned the appropriate roles for your work.
- To manage courses as part of the Course Reserve workflows, you must have one or more of the following roles:
- Course Reserves Operator
- Course Reserves Manager
- Fulfillment Services Operator
- Fulfillment Services Manager
Overview of Reserve Workflow
These four parts must be completed to successfully put an item on reserve:
- Part 1: Adding the course(s)
- Part 2: Adding reading lists to the course(s)
- Part 3: Adding materials (reserve items) to the reading lists
- Part 4: Setting the reserves so that they show up correctly in Primo VE
There are multiple workflows for the end of semester/term transition. These are overviewed under the section:
- Semester/Term transitions for reserves
Additional sections found in the how-to:
- Troubleshooting
- Workflow: Manually returning/restoring a library's item to its permanent shelving location
- Workflow: Remove items from a reading list
- Workflow: Remove reading list from a course
- Workflow: Delete a reading list- multiple methodologies
- Manual
- Via job
- Workflow: Delete a course- multiple methodologies
- Manual
- Via job
- Workflow: Archive and Unarchive a reading list- multiple methodologies (new functionality November 2022)
- Manual
- Via job
- Workflow: Archive and Unarchive a course- multiple methodologies (new functionality November 2022)
- Manual
- Via job
- Workflow: Gather reserve statistics (forthcoming)
Documentation from Ex Libris
- Documentation:
Part 1: Adding courses
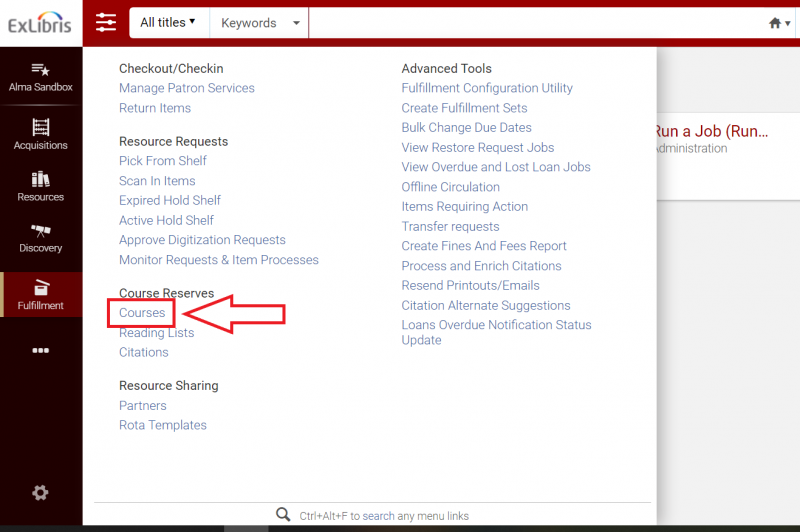
- Under the Fulfillment Tab> Course Reserves> select "Courses."
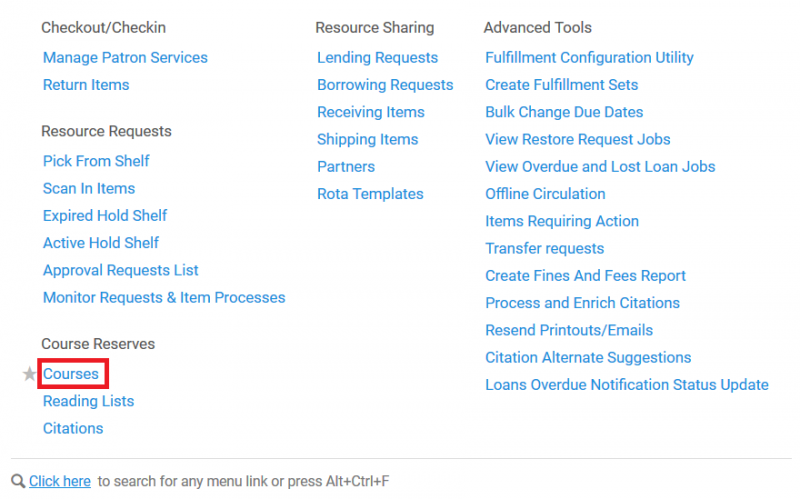
- On the "Courses" main page, click on "Add Course."

- This will open the course creator page.
- On the course creator page, the "Course Information" tab provides options to add the following course information.
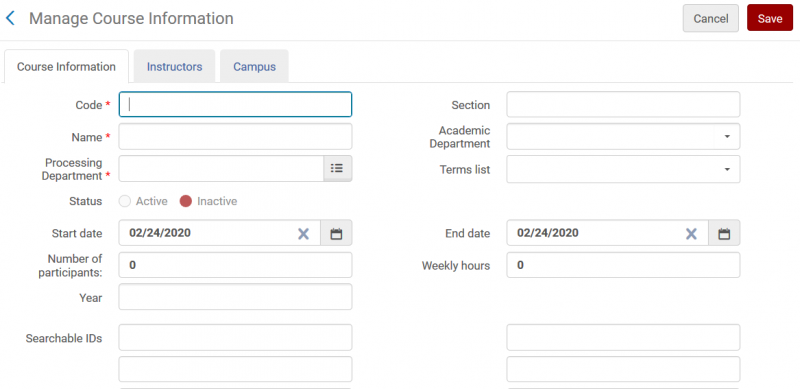
Enter data for all of the required fields, and optional fields as desired, for the course.- Required Fields:
- Code: Enter the course code (examples: ENGL1101, MTH 230, or CAT:112). Note that your library will want to define a standard format for this code and use it consistently. This will be one of the primary methods of searching for course reserve materials in Primo VE, and consistent spacing and punctuation will be important for your users.
- Name: Enter the course name. This is also a field for which you will want a standard naming convention, as it is a searchable field in a Primo VE "course reserves" search.
- Processing Department: Use the drop down menu to select the appropriate processing department for your library.
- Start date AND End date: Although these fields do not have an asterisk designating them as required fields, you will not be able to make your course active, and materials discoverable in Primo VE, without these dates. You will want to select the start and end dates according to when the materials should be actively on reserve and searchable via Primo VE.
- Optional Fields:
- Section: Used to designate a specific section for the course.
From Ex Libris: "The combination course code + section must be unique. If you do not use sections, then all course codes must be unique." - Academic Department: Use this drop down menu to select the appropriate department. Your Alma Fulfillment Configuration Administrator can configure academic departments for your institution from the Course Faculties code table (Configuration Menu > Fulfillment > Courses > Academic Departments).
- Terms list: Select the appropriate timeframe for which the course will be active. Your Alma Fulfillment Configuration Administrator can configure the terms list for your institution from the Course Terms code table page (Configuration Menu > Fulfillment > Courses > Course Terms). It is not possible to add or delete course terms from this table; however, you can customize the course term descriptions and enable/disable the terms.
- Number of participants: The number of students that are enrolled in the course.
- Weekly hours: The number of hours the course is taught, per week.
- Year: Academic course year.
- Searchable IDs: Additional IDs by which you want your patrons to be able to search for course reserves in Primo VE. This could include things such as the "common name" for a course, a professor, or materials on the reserve lists; or alternate formats of the course code, etc.
- Section: Used to designate a specific section for the course.
- Required Fields:
- On the course creator page, the "Instructors" tab allows you to associate one or more instructors with the course.
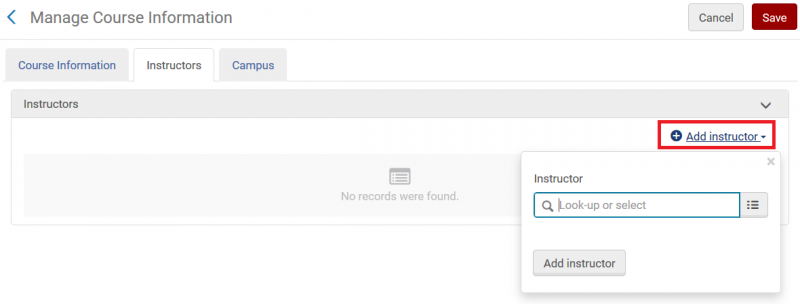
Enter data for the instructors of the course.- Select "Add Instructor" on the right side of the screen.
- Using the format "last name, first name" to search for the instructor of the course. Users from your database will begin to appear in a list as you type. Select the appropriate user from the list.
- Click on "add instructor."
- Repeat this step as needed to associate multiple instructors with the course.
- The optional "Campus" tab allows institutions with multiple campuses configured in Alma to associate the course with a specific campus.
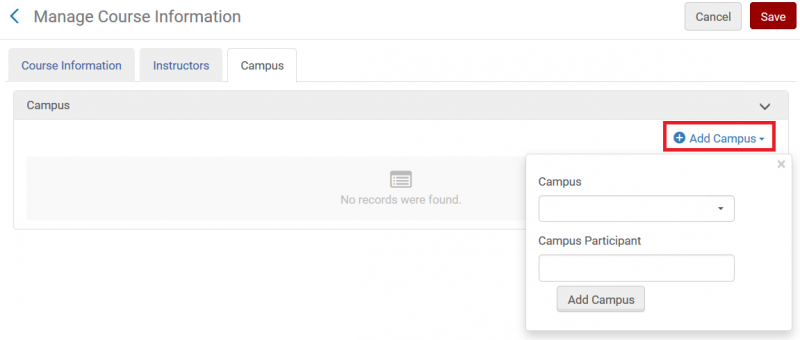
- When all three tabs have been completed as per your local procedures (Course Information, Instructors, Campus), click "save" on the top right of the page. This will take you back to the full list of courses for your institution.
Part 2: Adding reading lists
Three options for adding, sharing, or modifying readings lists are outlined below.
- Option 1: Adding a reading list to be used by a single course.
- Option 2: Adding a reading list to be used by multiple courses.
- Option 3: Duplicating a reading list for re-use in a new course.
Option 1: Adding a reading list to be used by a single course.
- When you are ready to add a reading list to your course, under the Fulfillment Tab> Course Reserves> select "Courses."
- Enter the course code in the search box at the top of the page and press enter/search.

This will retrieve only the course that matched your entered code. - Click on the ellipsis for the course, then select "Reading List" from the drop down menu to be taken to the course's reading list page.

- Select the "add reading list" button on the right side of the screen.

- This will open the "Add Reading List" window.
- On the "Add Reading List" window, enter data for all four fields:

- Code: Typically, enter the course code as it was entered in the associated course.
- Status: Select the appropriate status for the reading list for your library's workflow.
- "Being Prepared" means there is more work to do with the list, at a later time or by another staff member.
- "Complete" means that after staff are finished with the reading list, work is complete.
- Name: Typically, enter the course name as it was entered in the associated course.
- Due Back Date: Alma should automatically populate the "due back date" to the date set in the associated course information.
- Click "Add and Close." The course and associated reading list are now created.
Option 2: Adding a reading list to be used by multiple courses.
You can use the same reading list for multiple courses. For example, if your first-year writing courses all have shared core texts, but then professors are able to add supplementary materials on the topics of their choosing.
- Create the Reading List for one of the courses that will use the list, following the steps outlined in Option 1 above. For the Code and Name in step 6, you'll select a code/name that describe the shared use of the list, rather than naming it for one specific course.
- After the reading list is created, click on the ellipsis for the list you wish to associate with additional course(s), and select "Associate this list with a course" from the menu.
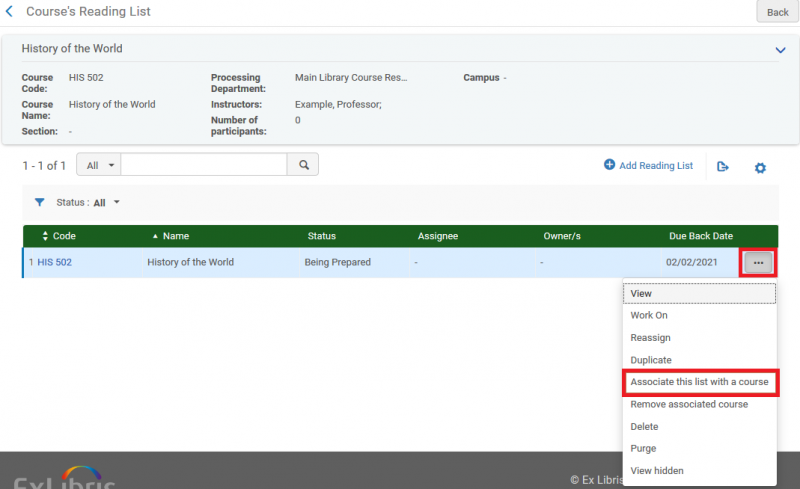
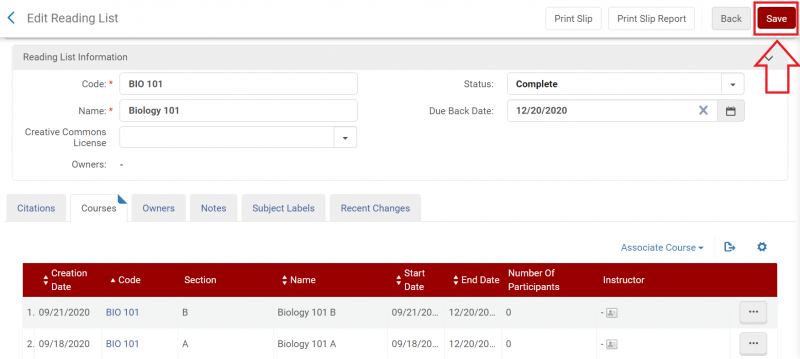
(If you are associating the Reading List with a different course at a later date, you can locate the reading list through Fulfillment> Course Reserves> select "Reading Lists." Your institution's reading lists will be listed on the All tab.) - The Edit Reading list window will open. Select the "Associate course" option, and browse/search for the additional course(s) to associate with this list.
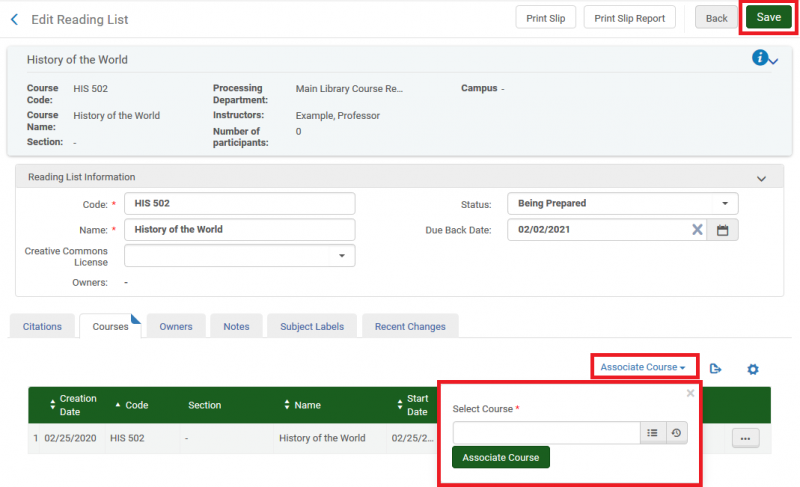
- Select Save when you've finished associating additional courses with the reading list.
Option 3: Duplicating a reading list for re-use in a new course.
You can copy a reading list and apply it to another course. For example, if you are preparing the spring reserves during the fall semester, and a professor is putting many but not all of the same items back on reserves for the following semester. You want to create a new list for the spring course with the appropriate titles, but cannot reassign/adjust the fall list since it is still in use.
- Search for the course that has the reading list you would like to copy. Enter the course code in the search box at the top of the page and press enter/search.
- This will retrieve only the course that matched your entered code.
- Select the ellipsis for the course, select "Copy Reading List" from the drop down menu to be taken to a list of all of the available reading lists at your institution.

- Select the checkbox for the list you want to copy, and then the Select button.

- After the list is selected, you will be returned to the course view. Select the ellipsis for the course, and then Reading List to view the copied list.
- Notice that the code and name of the copied reading list have a number appended in parenthesis, example- (1).
Select the course code to open the Reading List editing window.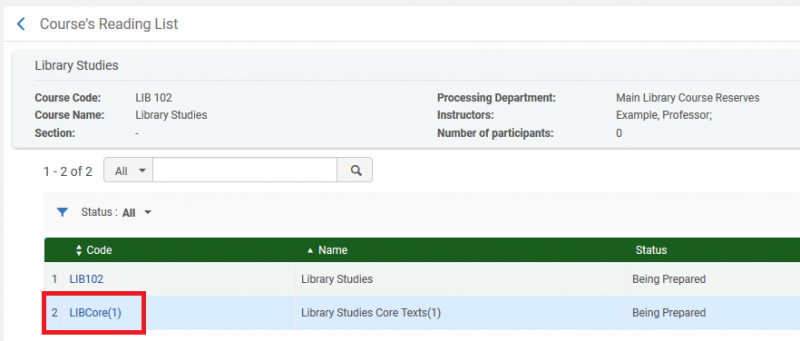
- Modify the code and name to reflect the course this list is assigned to, then Save.

Part 3: Adding materials to reading lists
Option 1: Adding physical items from your library's permanent collection, method 1: Scan in items
- Under the Fulfillment drop down menu, select "Scan In Items."
- On the "Scan In Items" page, select the "Change Item Information" tab.
- Make appropriate changes to the fields described below before scanning items:
- Change Type: Select "Temporary"
- Due Back: Enter the last day of the semester if items are to be re-shelved. For permanent reserves leave this blank.
- Location: Choose the location for the reading list materials, for example, "Reserves" or "Circulation Desk."
- Item Policy: Select the item policy requested by the instructor, for example, "2 Hour Course Reserves."
- Reading List: Select the reading list from the drop down menu, or, start typing the name of the reading list and select it when listed.
- Check Requests: Box should be checked.
- Scan in the items you want to add to the reading list and click the "Exit" button when done.
Option 2: Adding physical items or electronic books from your library's permanent collection, method 2: Direct add
For both physical items and electronic books:
- Under the Fulfillment drop down menu, select "Reading Lists."
- If you know the unique code for the reading list you are looking for, you can enter it into the persistent search box, which will have automatically been set to "Reading lists." Otherwise, search for the desired reading list under one of the four tabs available on the Reading Lists Task List page.
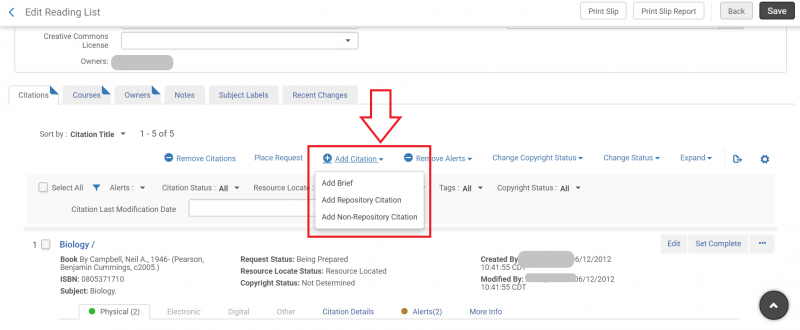
- Selecting the desired reading list will open the Edit Reading List page. Scroll down to find "Add Citation" and click to deploy the drop down menu. Click on "Add Repository Citation."

- The Repository Search screen will open. Search for the title you wish to add to the reading list in the persistent search bar.

- Check the box next to the title you wish to add to the reading list, then click the "Select" button.

- The title has been added to the reading list.
For physical items, you must manually create a move request:
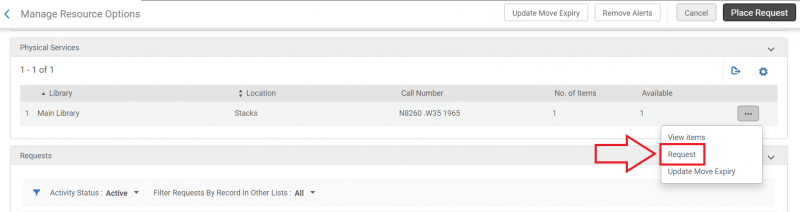
- Find the title you just added in the reading list and click on the "More actions" ellipsis to deploy the drop down menu. Click on "Manage Fulfillment Options."
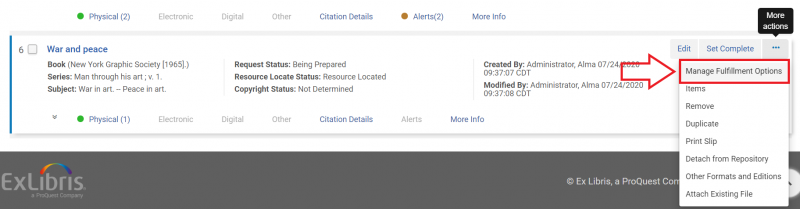
- The Manage Resource Options screen will open. Click on the ellipsis for the item you want to request and select "Request."
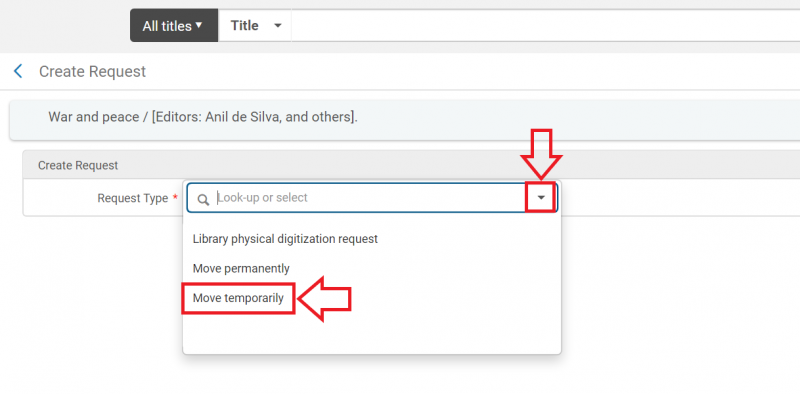
- The Create Request screen will open. Deploy the "Request Type" drop down menu and select "Move temporarily."
- More fields will appear on the Create Request screen. Populate the "To" field with the item's new location. If applicable, populate the "Due Back" field as well, then click the "Submit" button.
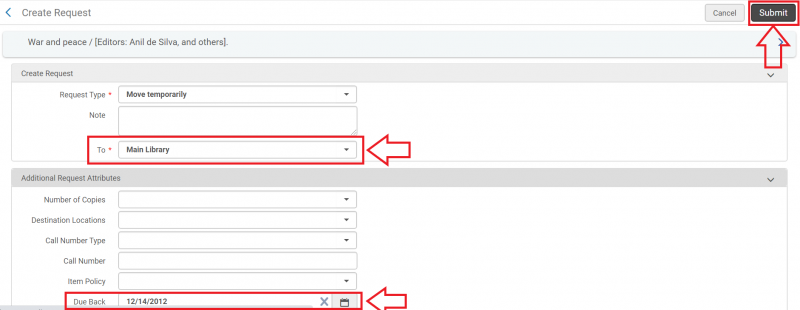
- The request for the item is now generated, and will be processed through the Pick From Shelf workflow.
- Note: If the requests do not show in your library's Pick from Shelf list, your Alma Configuration> Fulfillment> Physical Fulfillment> Request Pickup Configuration> rule that governs the request type of "Move temporarily" may need to be adjusted so that the "Show in Pick From Shelf" list value is set to True. Decisions about this setting were made in fall 2019 in your institution's Alma migration process configuration form, and may not meet your current workflow needs. Please feel free to contact CARLI Support for assistance in modifying the "Request Pickup Configuration" settings.
Option 3: Adding physical items NOT in your library's permanent collection
- Under the Fulfillment drop down menu, select "Reading Lists."
- If you know the unique code for the reading list you are looking for, you can enter it into the persistent search box, which will have automatically been set to "Reading lists." Otherwise, search for the desired reading list under one of the four tabs available on the Reading Lists Task List page.
- Selecting the desired reading list will open the Edit Reading List page. Scroll down to find "Add Citation" and click to deploy the drop down menu. Click on "Add Brief." (Note: do NOT choose Non-Repository Citation. These do not display in Primo VE.)
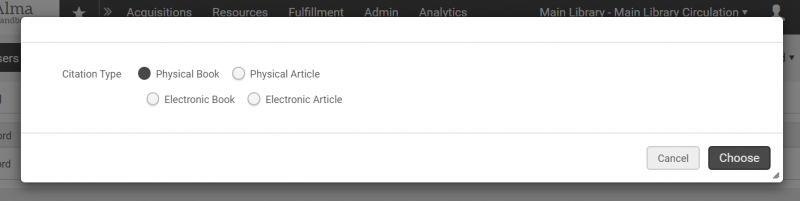
- A pop-up screen will appear. Select either "Physical Book" or "Physical Article," then click the "Choose" button.
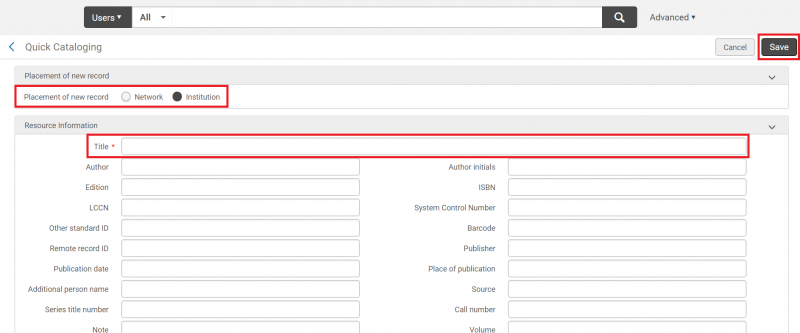
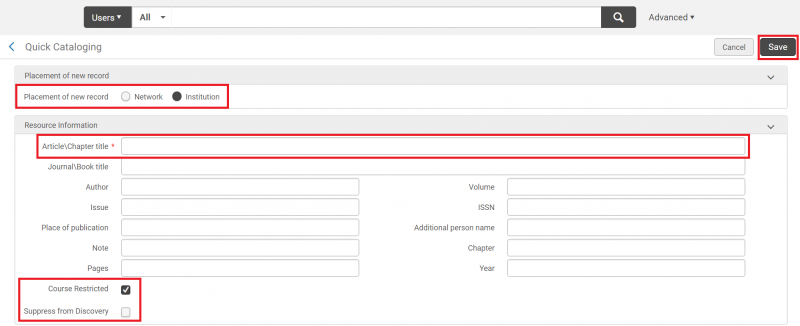
- The Quick Cataloging screen will open. There are several fields you will need to fill out.
- For "Placement of new record," select "Institution" for inclusion in your institution's catalog or "Network" to be included in the shared catalog.
- Under "Resource Information," the "Title" field is required. Fill out as many additional fields in this section as are defined by your institution's best practices.
- Check the box by "Course Restricted." This will ensure that the item will only appear in a search of course reserve materials, rather than a general discovery search.
- Do not check the box next to "Suppress from Discovery." This will ensure that the item is discoverable in a search of the course reserves in your discovery layer.
- Using the drop down menu, set the "Copyright Status" field to "Not Required."
- In both the "Citation Parameters" and "Item Information" sections, use the drop down menus to set the appropriate "Material Type" for the item you are entering.
- Using the drop down menu, set the "Location" field to the appropriate Reserves Location.
- Using the drop down menu, set the "Item Policy" field to the appropriate loan period.
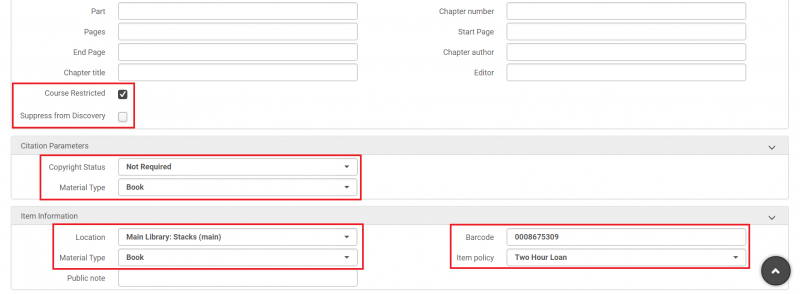
- Scan the item's barcode into the "Barcode" field under "Item Information." This will automatically take you back to the course reading list. Alternately, enter the barcode manually and click the "Save" button.
Option 4: Adding e-resources not in your permanent collection
- Under the Fulfillment drop down menu, select "Reading Lists."
- If you know the unique code for the reading list you are looking for, you can enter it into the persistent search box, which will have automatically been set to "Reading lists." Otherwise, search for the desired reading list under one of the four tabs available on the Reading Lists Task List page.
- Selecting the desired reading list will open the Edit Reading List page. Scroll down to find "Add Citation" and click to deploy the drop down menu. Click on "Add Brief." (Note: do NOT choose Non-Repository Citation. These do not display in Primo VE.)
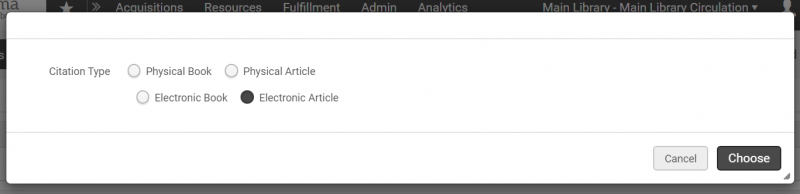
- A pop-up screen will appear. Select either "Electronic Article," then click the "Choose" button.
- The Quick Cataloging screen will open. There are several fields that you will need to fill out.
- For "Placement of new record," select "Institution" for inclusion in your institution's catalog or "Network" to be included in the shared catalog.
- Under "Resource Information," the "Article/Chapter title" field is required. Fill out as many additional fields in this section as are defined by your institution's best practices.
- Check the box by "Course Restricted." This will ensure that the item will only appear in a search of course reserve materials, rather than a general discovery search.
- Do not check the box next to "Suppress from Discovery." This will ensure that the item is discoverable in a search of the course reserves in your discovery layer.
- Using the drop down menu, set the "Copyright Status" field to the appropriate value.
- "Material Type" has the default value of "Electronic Article" but can be adjusted using the drop down menu if necessary.
- Using the drop down menu, set the "Library" field to the appropriate value.
- In the "Portfolio URL" field enter the URL for the resource. The URL must start with http:// and can be a link to a website, article database, pdf saved to an institutional drive, etc. Double check that there are no spaces in your file or folder name, as Alma will automatically remove spaces from the URL.

- When you have finished, click the "Save" button.
Part 4: Complete the reserves
When you have added all course materials to a reading list, you will need to set the reading list to "Complete" to make it visible to patrons.
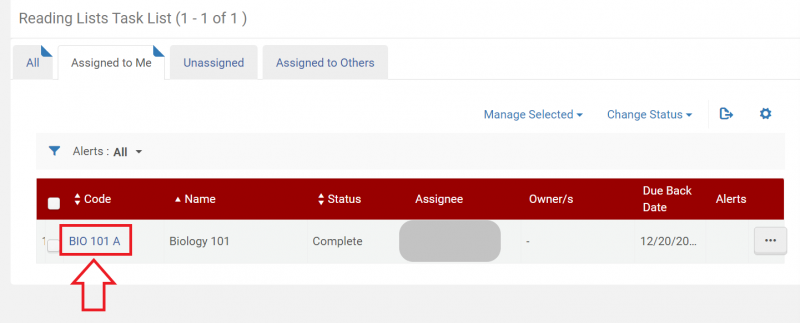
- Under the Fulfillment drop down menu, select "Reading Lists."
- If you know the unique code for the reading list you are looking for, you can enter it into the persistent search box, which will have automatically been set to "Reading lists." Otherwise, search for the desired reading list under one of the four tabs available on the Reading Lists Task List page.
- Using the drop down menu, set "Status" to "Complete."
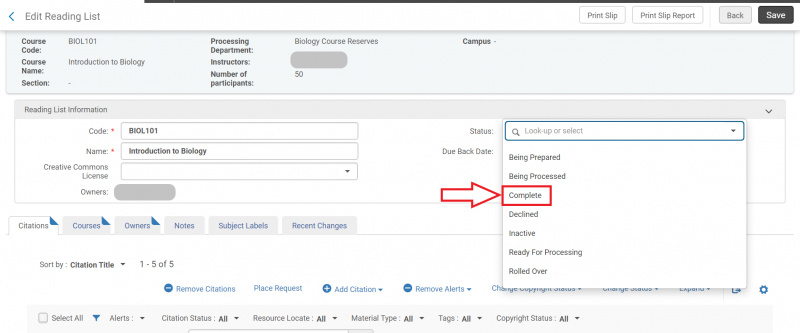
- Click the "Save" button.
Troubleshooting
Why aren't Course Reserves records (Citations) displaying in Primo VE?
Updated 1/20/2021
Check if:
- The Bibliographic record for the Citation or the Holdings record of the Item is suppressed in Alma. The records must not have the "Suppress from Discovery" management tag checked in the MDEditor. Unsuppress the bib record so it can be published to Primo VE.
- The Course is "Active" as of today as defined by its "Start date" and "End date". If the Course is not Active, its records will not display.
- The job "Activate/Deactivate Courses" is enabled and has been running successfully. When activating or deactivating courses, this job publishes the bibliographic citations linked to the course. To see if it has been running, go to Admin > Monitor Jobs > History > change the limit box to Name and enter the job name: Activate/Deactivate Courses
- Restricted Search Groups have been set up in Configuration Menu > Discovery > Search Configuration > Restricted Search Groups. This may have been done for you by Ex Libris during migration due to choices made on the Alma Configuration Form. When a Restricted Search Group is configured, only users that match the criteria can search and retrieve Course Reserves. When configuration is incomplete--such as the definition was created but no input parameters were added to the rule--no user will be able to see Course Reserves. If restriction isn't necessary, the simplest solution is to remove the Restricted Search Group from configuration.
- Course Restricted functionality is "on" in Configuration Menu > Resources > General > Other Settings > parameter "course_restricted_field" is set to 957$$r (this field was a CARLI consortial decision), AND the bib record has the field 957$$r CR_RESTRICTED field in it. If so, you can remove the 957$$r CR_RESTRICTED field from the bib using the MDEditor. (Note: The field text 957$$r ON RESERVE does not cause this.)
- The Citation is a "Non-Repository Citation". Non-Repository Citations are not published and will never display in Primo VE. Use "Add Brief" or "Add Repository Citation" to add the citation instead.
If none of these reasons seem to explain why the Course Reserve items aren't displaying in Primo VE, please contact CARLI Support with examples.
Adapted from the Ex Libris Knowledge Article Course Reserves/Reading List Checklist for Alma-Primo.
Semester/Term transitions for reserves
Let's Talk About Fulfillment 12/9/2022: Semester transitions for reserves

Webinar topics and time-stamps:
- Agenda and overview: 00:00-03:18
- "Due Back Date" significance: 03:18-24:50
- Overview of end of semester/term reserves workflows: 24:51-27:59
- Manual edits to courses, reading lists, and item due back dates: 28:00-37:24
- Deleting vs. Archiving reserve items/reading lists/courses: 37:25-49:07
- Editing coures, reading lists, and item due back dates via jobs: 49:08-1:11:08
- Q & A: 1:11:09-1:18:40
Documentation mentioned during the session:
- CARLI Alma Configuration: Request Pickup Configuration
- Ex Libris Alma November 2022 Release Notes
- Ex Libris Alma Course Reserves Analytics Fields
- Ex Libris Alma Course Bulk Update Job
- Ex Libris Alma Reading List Bulk Update Job
Workflow: Manually returning/restoring a library's item to its permanent shelving location
When it is time to remove materials from a reading list (such as, at the end of the semester, or, if the reserve instructor is otherwise ready to have the item removed), if the item is owned by the library, you will want to "restore" the item to its permanent location and item policy.
Note: Restoring the item to its permanent shelving location is not enough to remove the item from reserves. You will also need to follow the steps for Workflow: Remove items from a reading list to fully take the item off of reserves.
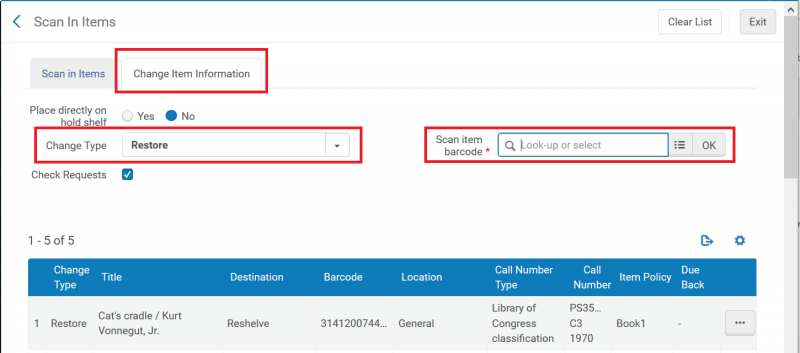
- Under the Fulfillment menu, select "Scan in Items."
- Select the "Change Item Information" tab.
- In the "Change Type" field, choose "Restore."
- Scan in the item barcode for the item(s) to be returned to its permanent shelving location and item policy.
- The item will now display in the change history on the bottom of the Scan in Items page; Double-check the change type and destination have updated as expected.
Workflow: Remove items from a reading list
- Under the Fulfillment menu, select "Reading Lists."
- If you know the unique code for the reading list you are looking for, you can enter it into the persistent search box, which will have automatically been set to "Reading lists." Otherwise, search for the desired reading list under one of the four tabs available on the Reading Lists Task List page.
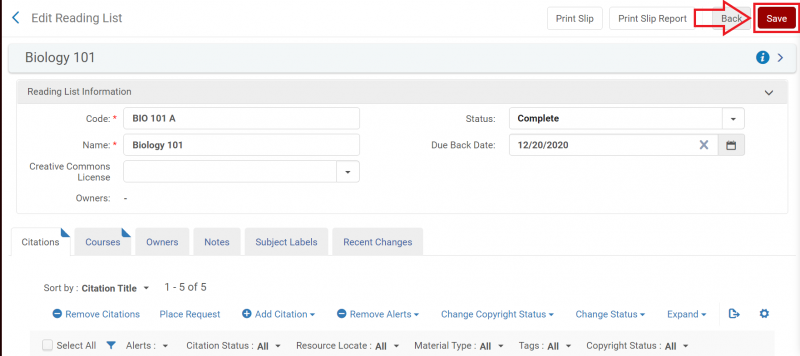
- Select the reading list you will be editing by clicking on the Code for that list.
- The Edit Reading List screen will open.
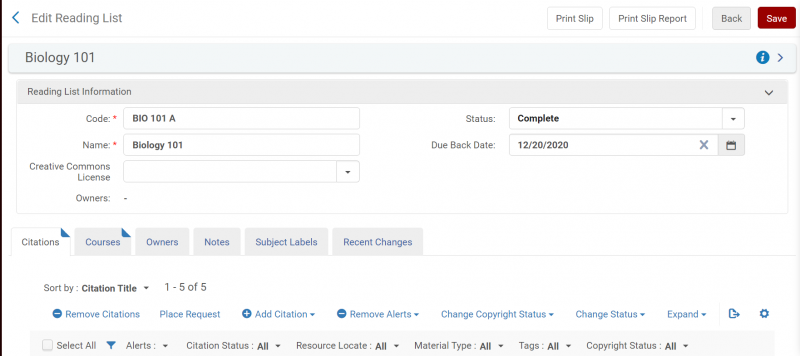
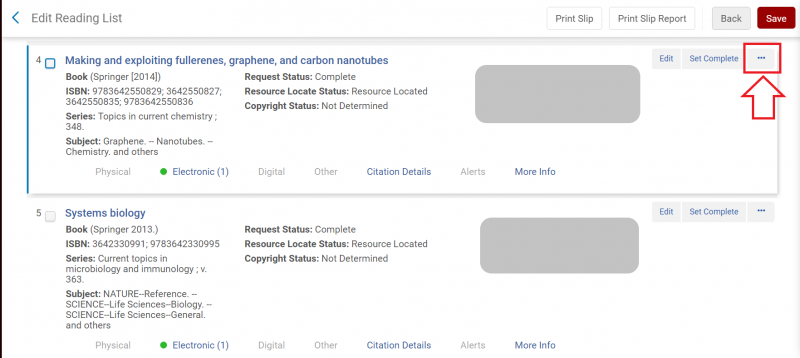
- Scroll down until you find the item you wish to remove from the reading list. Click on the "More actions" ellipsis.
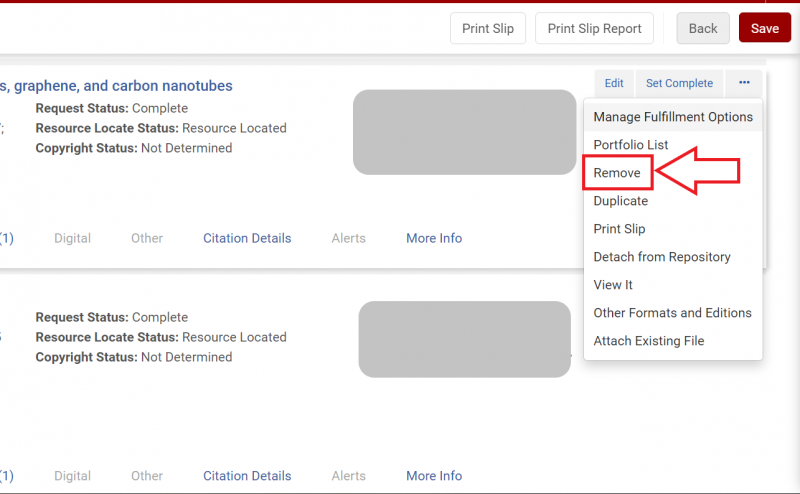
- The "More actions" menu will deploy. Click on "Remove" to delete the item from the reading list.
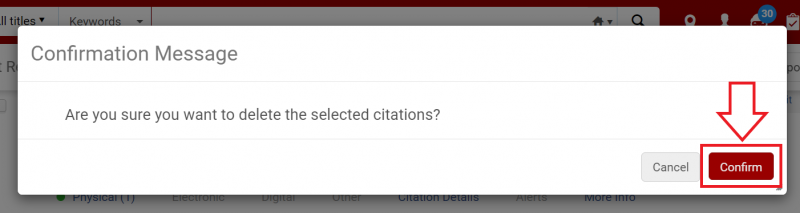
- A Confirmation Message pop-up will appear. Click on the "Confirm" button.
- Repeat as needed. Once you have removed all the items necessary from the reading list, click the "Save" button.
Workflow: Remove reading lists from a course
- Under the Fulfillment drop down menu, select "Reading Lists."
- If you know the unique code for the reading list you are looking for, you can enter it into the persistent search box, which will have automatically been set to "Reading lists." Otherwise, search for the desired reading list under one of the four tabs available on the Reading Lists Task List page.
- For the reading list you wish to remove, click the associated "More actions" ellipsis.

- From the resulting drop down menu, click on the "Remove associated course" option.
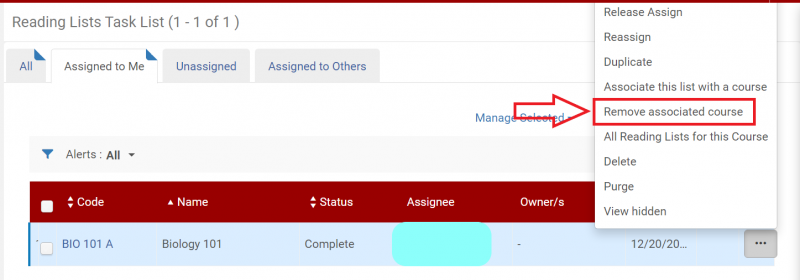
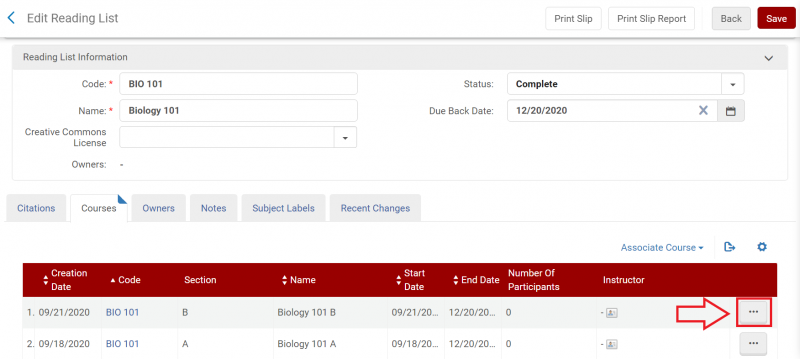
- If the reading list was only associated with one course then the screen will remain the same (though the options available under the "More actions" ellipsis will change) and there is nothing further you need to do in this workflow. If the reading list is associated with more than one course the Edit Reading List screen will open and you will proceed to step 6.
- Locate the course you want to disassociate from the reading list and click on the "More actions" ellipsis.
- Click on "Remove Association."
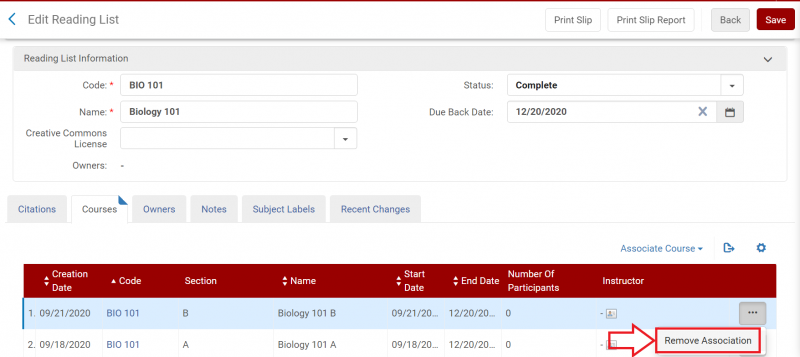
- Click the "Save" button.
Workflow: Delete reading lists- multiple methodologies
Workflow: Delete reading lists manually
When a reading list is no longer needed by your institution, you may wish to permanently delete the list.
Choosing to "Delete" a list, instead of "Archiving" the list fully removes it from Alma- the information from the list is no longer maintained in Analytics.
It is okay to delete a reading list, but you will want to have your statistics recorded first.
- Under the Fulfillment drop down menu, select "Reading Lists."
- If you know the unique code for the reading list you are looking for, you can enter it into the persistent search box, which will have automatically been set to "Reading lists." Otherwise, search for the desired reading list under one of the four tabs available on the Reading Lists Task List page.
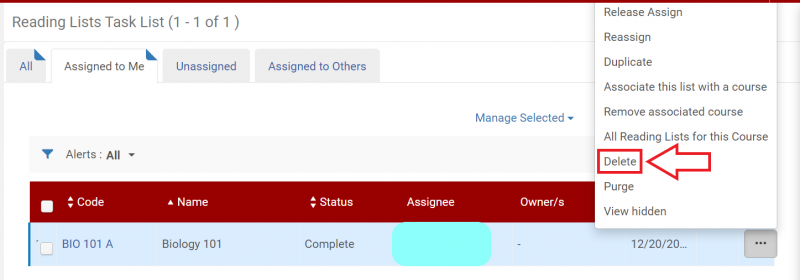
- For the reading list you wish to delete, click the associated "More actions" ellipsis.
- Select the "Delete" option from the drop down menu.
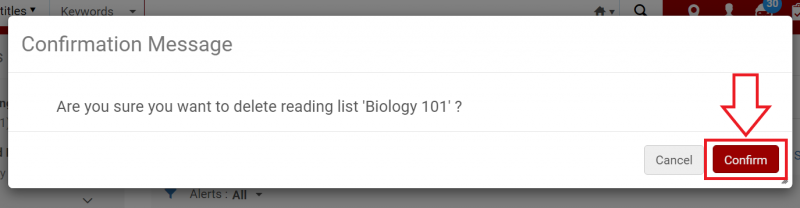
- A pop up screen will appear. Click the "Confirm" button.
Workflow: Delete reading lists via job
Deleting reading lists removes them from Alma entirely, including from Analytics. If you want to save statistics from a reading list, you can archive it instead.
Creating a Set
1. Enter a name for the set.
2. Select Reading Lists from the Set Content Type list.
You will see a list of reading lists.
3. Select the reading lists to archive and select Add Selected.
4. Select Done when you have finished.
Run the Job
1.Select Admin > Run a job > Reading List Bulk Update.
2. Select Next.
3. Select the set to use and select Next.
4. Select Delete list and select Next
.
5. Doublecheck the parameters and select Submit.
6. Check the report after the job has run to verify that it ran correctly.
Workflow: Delete courses- multiple methodologies
Workflow: Delete courses manually
When a course is no longer needed by your institution, you may wish to permanently delete the course.
Choosing to "Delete" a course, instead of "Archiving" the course fully removes it from Alma- the information from the course is no longer maintained in Analytics.
It is okay to delete a course, but you will want to have your statistics recorded first.
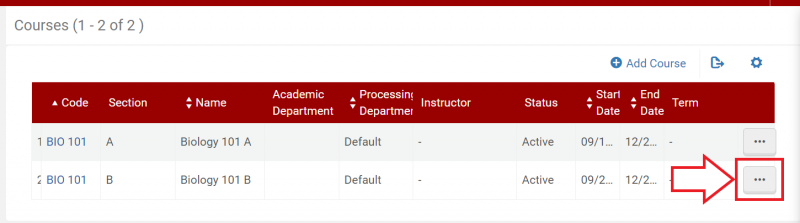
- Under the Fulfillment drop down menu, select "Courses."
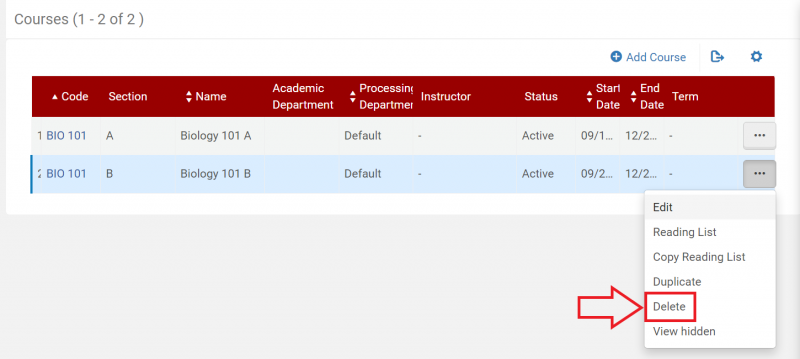
- A list of courses will appear. Click on the "More actions" ellipsis for the course you wish to delete.
- Select the "Delete" option from the drop down menu.
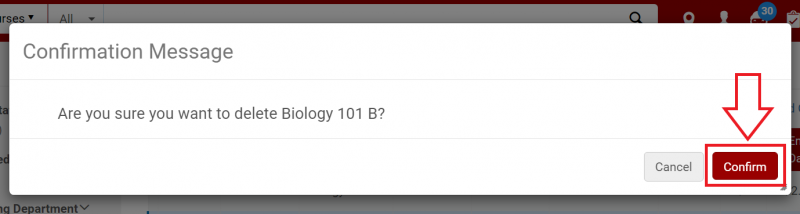
- A pop up screen will appear. Click the "Confirm" button.
Workflow: Delete courses via job
Deleting courses removes them from Alma entirely, including from Analytics. If you want to save statistics from a course, you can archive it instead.
Creating a Set
You will see a list of courses.
- Enter a name for the set.
- Select Courses from the Set Content Type list.
- Select the courses to delete and select Add Selected.
- Select Done when you have finished.
Running the Job
- Select Admin > Run a job > Course Bulk Update.
- Select Next.
- Select the set to use and select Next.
- Select Delete course and select Next.

- Doublecheck the parameters and select Submit.
- Check the report after the job has run to verify that it ran correctly.
Workflow: Archive and Unarchive reading lists- multiple methodologies (new functionality November 2022)
When a reading list is no longer needed by your institution, you may wish to archive the reading list, so that it no longer shows in your "visible" list of reading lists in Alma, but is retained in Alma Analytics. Archived reading lists can also be "unarchived" as needed, if you wish to reuse them later.
Choosing to "Delete" a reading list, instead of "Archiving" the reading list fully removes it from Alma- the information from the reading list is no longer maintained in Analytics.
It is okay to delete a reading list, but you will want to have your statistics recorded first.
Workflow: Archive and Unarchive reading lists manually
When a reading list is no longer needed by your institution, you may wish to archive the reading list, so that it no longer shows in your "visible" list of reading lists in Alma, but is retained in Alma Analytics. Archived reading lists can also be "unarchived" as needed, if you wish to reuse them later.
Choosing to "Delete" a reading list, instead of "Archiving" the reading list fully removes it from Alma- the information from the reading list is no longer maintained in Analytics.
It is okay to delete a reading list, but you will want to have your statistics recorded first.
To Archive a Reading list
If you archive the course that the reading list is attached to, the reading list will automatically be archived. Review the options for how to Archive a Course.
To UnArchive a Reading list
- Under the Fulfillment drop down menu, select "Reading Lists."
- A list of reading lists will appear.
- Select "More actions" ellipsis for the course you wish to unarchive.
- Select the "Unarchive" option from the drop down menu.
- You will receive an alert:
- If the course is unarchived, you will receive an alert that "This list [list name] will be unarchived and set to Draft publication status. Are you sure?" Confirm your choice.
- If the course is still archived, you will receive a warning that "This list is associated with archived course [course name]. You must first unarchvie the course."
- To reuse the reading list, you will need to then reset the publication status from "Being Prepared" to "Complete."
Workflow: Archive and Unarchive reading lists via job
You cannot archive or unarchive a reading list using a job. You can archive or unarchive the course associated with a reading list, however, which will archive or unarchive the associated reading list.
Workflow: Archive and Unarchive courses- multiple methodologies (new functionality November 2022)
When a course is no longer needed by your institution, you may wish to archive the course, so that it no longer shows in your "visible" course list in Alma, but is retained in Alma Analytics. Archived courses can also be "unarchived" as needed, if you wish to reuse them later.
Choosing to "Delete" a course, instead of "Archiving" the course fully removes it from Alma- the information from the course is no longer maintained in Analytics.
It is okay to delete a course, but you will want to have your statistics recorded first.
Workflow: Archive and Unarchive courses manually
When a course is no longer needed by your institution, you may wish to archive the course, so that it no longer shows in your "visible" course list in Alma, but is retained in Alma Analytics. Archived courses can also be "unarchived" as needed, if you wish to reuse them later.
Choosing to "Delete" a course, instead of "Archiving" the course fully removes it from Alma- the information from the course is no longer maintained in Analytics.
It is okay to delete a course, but you will want to have your statistics recorded first.
To Archive a Course
- Under the Fulfillment drop down menu, select "Courses."
- A list of courses will appear. Click on the "More actions" ellipsis for the course you wish to archive.
- Select the "Archive" option from the drop down menu.
- A pop up screen will appear.
- If the course has associated reading lists, the warning will say: "[#] reading lists that are associated with this course will also be archived. Are you sure you want to archive [Course name] and all its reading lists?"
- If the course has no associated reading lists, the warning will say: "Are you sure you want to archive this course?"
- Select the "Confirm" button.
- Use the "Visibility" facet for Course reserves to limit your display to Archived or Unarchived courses as needed.
To UnArchive a Course
- Under the Fulfillment drop down menu, select "Courses."
- A list of courses will appear.
- Using the options under the "Visibility" facet, limit your results to the "Archived" courses.
- From the filtered list of courses, select "More actions" ellipsis for the course you wish to unarchive.
- Select the "Unarchive" option from the drop down menu.
- The course is now unarchived. Any reading lists that were associated with the course previously will need to also be manually unarchived.
Workflow: Archive and Unarchive courses via job
Archiving Courses Via a Job
Creating a Set
1. Enter a name for the set.
2. Select Courses from the Set Content Type list.
You will see a list of courses.
3. Select the courses to archive and select Add Selected.
4. Select Done when you have finished.
Run the Job
1. Change the Description box to Name and enter Course.
2. Select the magnifying glass.
Course Bulk Update is displayed.
3. Select Course Bulk Update and select Next.
4. Select the set that you created and select Next.
5. Select Set Course Visibility and Archived.

6. Select Next.
7. Verify that Run Now is selected and select Submit.
8. After the job runs, view the report.
9. To view archived courses, select Fulfillment > Course Reserves > Courses and select Archives under Visibility.
Unarchiving Courses Via a Job
To unarchive courses, follow the same steps, but select Unarchived under Visibility.
Workflow: Gather reserve statistics (forthcoming)
Documetation from the CARLI office not yet available.
Ex Libris documentaiton on Reserve Analytics